Optimizations: Efficiency, Consumption and Heating Curve
For efficient operation and a long service life of the heat pump, there are several optimizations that you can carry out yourself. These optimizations depend on local conditions and personal preferences and therefore differ from heat pump to heat pump. Some of these optimizations—from simple to somewhat more complex—are listed below.
The following generally applies to efficient operation:
The lower the temperature(-difference), the lower the energy consumption!
Rule of thumb: each additional degree increases energy consumption by approx. 2.5% [Source]
Domestic hot water production
10–20% of the heat pump’s annual energy demand is used for domestic hot water production. Therefore, optimizations can also make a considerable contribution here.
Temperature
As with heating operation, the heat pump requires more energy for domestic hot water production the higher the target temperature is. Therefore, you should try to set the domestic hot water temperature as low as possible. This has the additional advantage that lower temperatures cause fewer mineral salts to crystallize, resulting in fewer limescale deposits that further impair efficiency. On the other hand, the risk of Legionella increases if the water is not heated sufficiently. Regular circulation or thermal disinfection can help here [bwp].
The domestic hot water temperature can be set using the Stop temperature. See also Domestic hot water production settings.
Charging delta
Another setting for domestic hot water production is the charging delta. The charging delta defines how much the flow temperature is raised above the domestic hot water temperature (see Domestic hot water production settings). The higher the charging delta, the faster the domestic hot water is heated. However, this also means that with a stop temperature of 48 °C and a charging delta of 12 K, the flow temperature is raised to 60 °C at the end. If, on the other hand, you reduce the charging temperature to 6 K, the temperature only needs to be raised to 54 °C at the end, but domestic hot water production naturally takes correspondingly longer.
Time of day
As the outdoor temperature rises, the heat pump can obtain more energy from the surrounding air. As shown in the following diagram, the average outdoor temperature in Germany is highest in the early afternoon (data from energy-charts.info). It therefore makes sense to schedule domestic hot water production for the early afternoon between 1 and 3 p.m.

For this purpose, you can use the Auto mode selection with, for example, 4 time programs and 2 modes:
- 1–5 p.m. = preferred time → Eco
- Start temperature: 41 °C
- Stop temperature: 48 °C
- 5–9 p.m. = acceptable time → Eco+
- Start temperature: 33 °C
- Stop temperature: 40 °C
- 9 p.m.–8 a.m. = unacceptable time → Off
- 8 a.m.–1 p.m. = acceptable time → Eco+
- Start temperature: 33 °C
- Stop temperature: 40 °C
In this example, domestic hot water is produced between 1 and 5 p.m. when its temperature has fallen below 41 °C. If it falls below the threshold of 33 °C in the preceding or following hours, it is heated during the still acceptable morning or evening hours. It is not heated at night.
The above settings work well only if you draw approximately 7–14 °C from the domestic hot water tank on typical days. On these typical days, domestic hot water production should then fall within the preferred time. However, if your daily consumption is higher, you should shift the Eco stop temperature upward accordingly. If your daily consumption is lower, you should adjust the Eco stop temperature so that domestic hot water production occurs every other lunchtime. You can check the current domestic hot water temperature either on the local control unit’s start screen, in the app or via a smart home system. At this point, I would like to emphatically point out once again that at such low water temperatures you must either ensure weekly thermal disinfection or complete water exchange in all pipes within a few days [bwp].
The setting described above can also make sense for owners of photovoltaic systems and in terms of the energy transition, because the highest PV yield in Germany can generally be expected at around 1 p.m. (see energy-charts.info). Anyone who owns a PV system can go one step further and optimize domestic hot water production using surplus PV power. For this, the comfort mode not used in the settings mentioned above is used. For further details on implementation, see, for example, the guide for evcc.
High temperature losses
What should you do in the event of high domestic hot water temperature losses?
I regularly receive messages from readers who have to produce domestic hot water several times a day, even though they have carried out the optimizations described above. We also recently had this problem from one day to the next, although it had worked without problems for more than a year. In our case, it was caused by limescale deposits in the check valve in the domestic hot water circulation pump, which fortunately then became unblocked on its own. For other readers, it was caused by the circulation pump running continuously. More on this in the next chapter. For a third group, the cause was a missing thermosiphon in the domestic hot water pipe, which the heating contractor then had to retrofit. In all three cases, domestic hot water flows continuously through the pipe and loses heat to the cold pipes and walls.
But when do domestic hot water losses actually count as high?
According to the specification, our 277-liter domestic hot water tank has a heat loss of 67 W. This means that the domestic hot water in the tank loses 67 watts or 0.21 kelvin per hour. A domestic hot water temperature of 65 °C and an ambient temperature of 20 °C are usually assumed. After one day, the domestic hot water tank therefore loses approximately 5 K, and the 65 °C hot water has cooled to 60 °C.
Mathematical derivation of domestic hot water losses
At a domestic hot water temperature of 65 °C in the 277 l tank and an ambient temperature of 20 °C, the following equation results in a temperature drop of around 0.21 K per hour:
\[ \Delta T = \frac{P \cdot t}{c \cdot m} = \frac{67\,\text{W} \cdot 3600\,\text{s}}{4182\,\frac{\text{J}}{\text{kg}\cdot\text{K}} \cdot 277\,\text{kg}} \approx 0{,}21\,\text{K} \]
\(\Delta T\) = temperature change in kelvin (K)
\(P\) = heat loss in watts (W)
\(t\) = period in seconds (s)
\(c\) = specific heat capacity of water = 4182 \(\frac{J}{kg \cdot K}\)
\(m\) = mass of the water in kilograms (kg)
However, if the domestic hot water temperature is lower, the heat loss is also lower. It decreases proportionally with the temperature difference. At a domestic hot water temperature of 45 °C, it is approximately 37 W or 0.11 K per hour:
Mathematical derivation of the reduced domestic hot water losses
\[
P_{neu} = P_{Norm} \cdot \frac{T_{Wasser,neu} - T_{Umgebung}}{T_{Wasser,Norm} - T_{Umgebung}} =
\]
\[ 67\,\text{W} \cdot \frac{45\,\text{°C} - 20\,\text{°C}}{65\,\text{°C} - 20\,\text{°C}} = 67\,\text{W} \cdot \frac{25\,\text{K}}{45\,\text{K}} \approx 37\,\text{W} \]
This results in a temperature decrease of 0.11 K per hour in our case:
\[ \Delta T = \frac{37\,\text{W} \cdot 3600\,\text{s}}{4182\,\frac{\text{J}}{\text{kg}\cdot\text{K}} \cdot 277\,\text{kg}} \approx 0{,}11\,\text{K} \]
In reality, we are close to this calculated value. In fact, we have a temperature loss of 0.16 K per hour when we draw no water and the circulation pump is not running. The gravity circulation caused by our blocked check valve resulted in an additional temperature loss of 0.33 K per hour. Each year, this leads to additional costs of just under €100 at an electricity price of 32 cents/kWh.
Mathematical derivation of the costs
Thermal loss per hour:
\[ Q_{h} = 4182\,\frac{\text{J}}{\text{kg}\cdot\text{K}} \cdot 277\,\text{kg} \cdot 0{,}33\,\text{K} \approx 382\,\text{kJ} \]
Thermal loss per year:
\[ Q_{Jahr} = \frac{382\,\text{kJ} \cdot 8760\,\text{h}}{3.600\,\frac{\text{kJ}}{\text{kWh}}} \approx 930\,\text{kWh}_{\text{th}} \]
Heat pump electricity demand at a seasonal performance factor of 3:
\[ E_{el} = \frac{Q_{Jahr}}{JAZ} = \frac{930\,\text{kWh}_{\text{th}}}{3} \approx 310\,\text{kWh} \]
Keeping an eye on the domestic hot water temperature loss can therefore certainly be worthwhile financially.
Domestic hot water circulation
If water remains in the pipe for a longer period, it cools down. To be greeted with hot water immediately when turning on the shower or tap, so-called circulation pipes were installed in many houses in the past. With the help of this additional pipe, hot water from the domestic hot water tank, which is often located in the heating basement, is circulated to the other floors. This means that less water is wasted by unnecessarily running down the drain until hot water finally reaches the tap or shower. At first, this sounds sensible as a way of using the precious resource of water sparingly.
However, the problem is that circulating hot water through the pipes causes heat energy to be lost to the colder masonry. In winter, one could argue that this additionally heats the house and that no energy is therefore lost. However, domestic hot water is generally at a higher temperature than the heating water, which means that more electrical energy was required to produce it, so this wastes considerable potential.
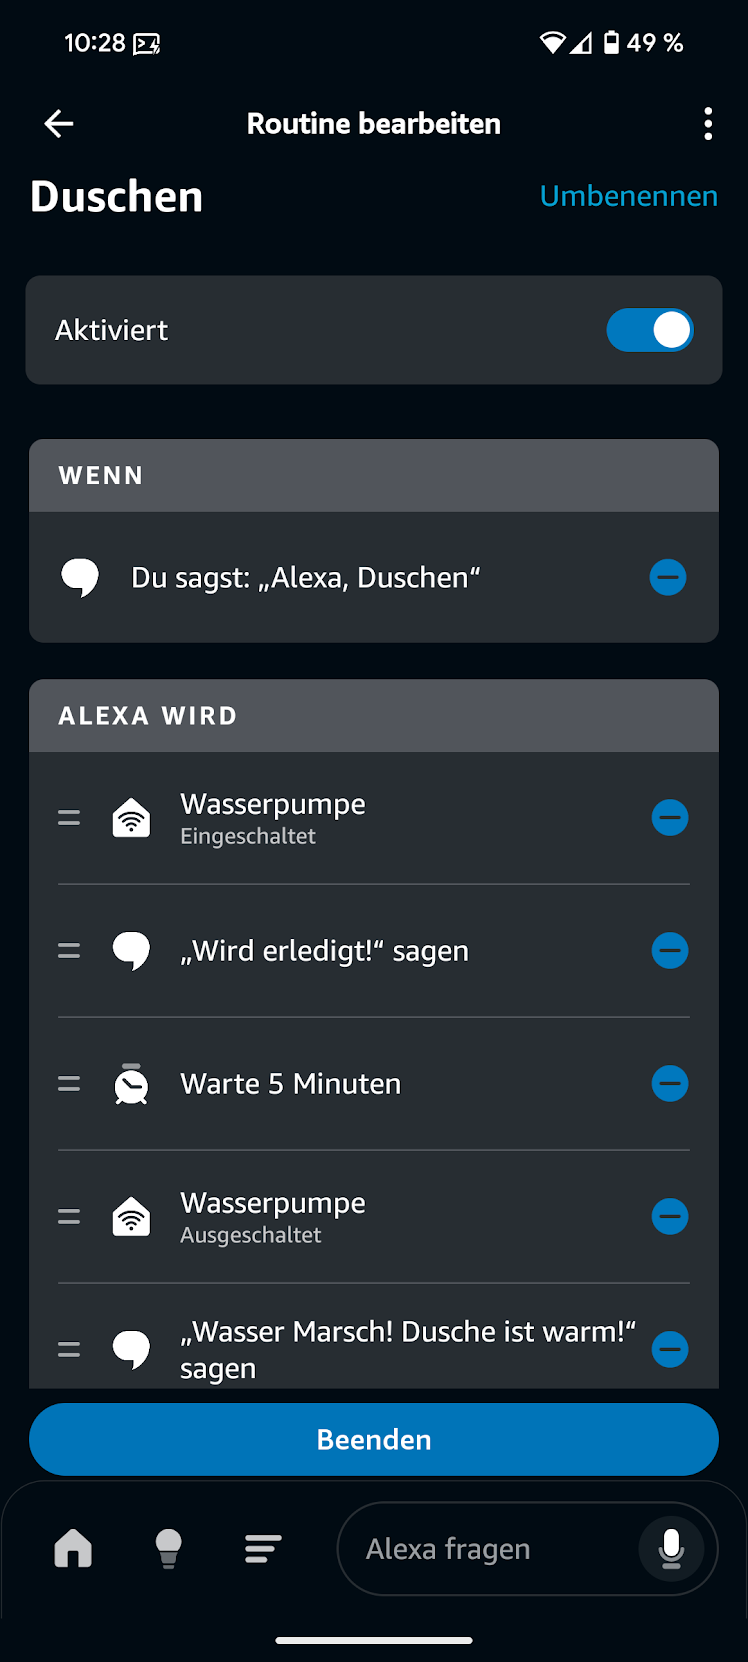
A logical conclusion would be simply to switch off the circulation pump. However, this is not a good idea because of the risk of Legionella. A first optimization is to reduce the operating time of the circulation pump in the heat pump settings. Alternatively, you can have the circulation pump connected to its own socket. You can then use a programmable plug, e.g. from Shelly, which activates circulation for 5 minutes at times of demand, e.g. in the morning and evening. This saves water while also reducing circulation energy losses to a minimum.
If you wish, you can go one step further and switch on the plug at times of domestic hot water demand using a Shelly button or an Amazon Alexa routine. You then simply press the button or say “Alexa, shower” to start the circulation pump for 5 minutes.
Cycling behavior
Using the configured heating curve, the heat pump determines the required target flow temperature for the current/damped outdoor temperature. Ideally, the actual flow temperature in the heating circuit (T0) would always follow the target flow temperature exactly. However, especially during the transitional period with comparatively high outdoor temperatures, this is not always possible because modulation cannot reduce the output arbitrarily far. Depending on the model, the limit is between 12% and 25% of maximum output. If too much heat is still being produced, the heat pump switches off. It switches off when the measured flow temperature exceeds the target flow temperature by 4 K. When the measured flow temperature falls approximately 2 K below the target flow temperature, the heat pump starts again.
The following diagram shows that at 10:32 a.m. the measured flow temperature T0 exceeds the target flow temperature by 4 K. The heat pump switches off. The measured flow temperature then falls until, at 12:22 p.m., it is approximately 2 K below the target flow temperature. The heat pump starts again.

This cycling behavior cannot be prevented during the transitional period.
However, it should not occur too frequently, because after starting, the compressor first has to be brought into operating mode, which reduces efficiency, and every unnecessary start increases wear.
You can view the number of compressor starts either on the control panel in the service menu under Info → Wärmepumpe → Statistik or in the app.
There you can also see the compressor operating hours, and if you divide the two values, you obtain the average length of a cycle.
For me, this is currently 6.5 hours per cycle.
If your value is very small, e.g. less than 1, you can try the following optimizations:
- Set the minimum flow temperature:
By setting the minimum flow temperature in the service menu under
Anlageneinstellungen→Heizung/Kühlung→Heizkreis 1→Heizen→Minimale Vorlauftemperatur, you ensure that the target flow temperature does not fall below the configured value even at higher outdoor temperatures. If the minimum flow temperature were set to 28 °C, the yellow line in the image above would not continue to fall at 10:30 a.m. This would prevent the switch-off threshold from being reached and the heat pump would continue running. However, this naturally causes the room temperature to rise and you consume electricity unnecessarily. - Alternatively or additionally, you can try to accept the cycling but reduce the number of cycles by using room-temperature night setback. This allows you to significantly reduce the room temperature for several hours, which will presumably force the heat pump to switch off. The flow temperature will then probably have fallen considerably, and the heat pump will need several operating hours without cycling to reach the target flow temperature again. Fluctuating room temperatures may reduce comfort.
Ideally, you should make sure when purchasing the heat pump that it is not oversized, so that modulation is largely sufficient during the transitional period as well.
Heating curve and thermal balancing
As with domestic hot water, it is essential during heating operation that the flow temperature is just low enough for the rooms to become just as warm as necessary. For this purpose, the heating curve and the flow rates of the individual heating surfaces are matched to one another. This step-by-step procedure is called thermal balancing. The individual room controls (ERR) and radiator thermostats should limit heat output as little as possible during normal operation. Many ERRs limit heat output by constantly opening and closing the water supply—similar to a car that constantly accelerates to maximum speed and then brakes to a standstill again, instead of driving at a constant speed. The aim is to supply the rooms continuously with the minimum necessary water temperature. The heat pump therefore only needs to heat to the minimum flow temperature that is currently necessary to heat all rooms to a comfortable temperature.
The critical rooms are particularly important: these are the rooms where the heating surfaces are most undersized in relation to the heat demand and the desired room temperature. This is not necessarily the room with the greatest heat demand—a small bathroom with a high desired temperature can also determine the necessary flow temperature. The heating surfaces in these rooms should not be throttled if possible.
The following 6-step guide to thermal balancing is from Haustechnikdialog.de:
- Prepare the system
In underfloor heating systems, the ERRs should be deactivated during balancing or the actuators should be removed. At the heating circuit manifolds, all throttling should be fully opened. For radiators, the thermostat heads should be fully opened or temporarily removed. The aim is for the ERRs/thermostats not to intervene during the measurement phase. Room temperatures should be determined only by the heating curve and flow rate. - Lower the heating curve roughly
Wait at least 1–2 days after preparation. If all regularly heated rooms are then warmer than desired, the heating curve is probably too high. Now lower the heating curve step by step. After each change, wait long enough again—ideally around 48 hours for slow-response underfloor heating systems. Continue reducing the heating curve until the first room just fails to reach its desired temperature. This room is your reference room: Under these conditions, its heating surface is the most undersized in relation to the demand. It will not be throttled during the rest of the balancing process. - Set the reference room correctly again
Raise the heating curve slightly again so that the reference room reliably reaches its desired temperature. The heating curve is now initially set as low as possible. Rooms that are still too warm without additional heat sources are then throttled slightly one by one. - Throttle rooms that are too warm step by step
Start with the room that is warmest in relation to its desired temperature. Slightly throttle the flow there and then wait at least 1–2 days again. If the room is still too warm afterward, throttle it slightly again. If it becomes too cold, open the flow somewhat again. - Check the heating curve after each throttling round
Throttling one room changes the distribution of heating water in the rest of the system. The reference room may therefore become somewhat warmer afterward. Check the reference room after each throttling round. If it becomes too warm, the heating curve can be lowered slightly further. Then check the rooms that have already been adjusted again and correct them slightly if necessary. - Repeat room by room
Repeat this procedure until all regularly heated rooms reach their desired temperature and the heating curve is set as low as possible. Thermal balancing is not a one-time task, but rather a gradual fine adjustment over several cold days or even an entire heating season.
You can use the following exercise to try out the interaction between the heating curve and valve presettings in two rooms.
Thermischen Abgleich ausprobieren
ⓘ
Das Beispiel zeigt zwei parallel angeschlossene Heizkörper bei 0 °C Außentemperatur. Raum 1 ist der Referenzraum.
Die Temperaturen zeigen jeweils den Zustand nach ausreichender Wartezeit. In einem echten Haus kann das ein bis zwei Tage oder länger dauern.
Die Wärmepfeile zeigen schematisch, ob ein Thermostat die Wärmeabgabe begrenzt; ihre Helligkeit ist kein Messwert.
Das stark vereinfachte Modell nimmt an, dass sich beim Drosseln eines Heizkörpers der Durchfluss im anderen leicht erhöht. Die tatsächliche Wirkung hängt von Pumpe und Anlage ab.
The procedure should be carried out on a cold day with sub-zero temperatures and little solar radiation. To adjust the heating curve in steps 2+5, reduce the flow temperature at the standard outdoor temperature (NAT). It should also be noted that it makes no sense for the target temperatures in adjacent rooms to differ significantly. A difference of a few degrees is fine, but if the differences are too large, the cold rooms are simply heated by the warm rooms and a higher flow temperature is again required in the warmer room.
Before adjusting the heating curve at the NAT, you should set the heating limit temperature. To do this, simply check in autumn at outdoor temperatures of around 15 °C at which temperature you leave the comfort range inside the house. This naturally varies from person to person. To prevent unnecessary cycling, a lower heating limit temperature is preferable.
Flow rates
At the same transferred heat output, a higher flow rate reduces the temperature difference between flow and return.
The water cools down less on its way through the heating surface.
As a result, the same heat output can be transferred with a lower flow temperature, which increases efficiency—as already known: approximately 2.5% per degree Celsius.
However, the additional benefit becomes progressively smaller as the flow rate increases.
A high flow rate, which is set in the service menu under Anlageneinstellungen → Heizung/Kühlung → Heizkreis 1 → Pumpensolldruckwert, is therefore generally advantageous for efficiency.
At the same time, however, the electricity consumption of the heating circuit pump increases and flow noise may become audible.
Therefore, the Pumpensolldruckwert should not be increased too much.
Flow rate and flow temperature
ⓘ
Move the slider: The same radiator continues to deliver 1,000 W to a room at 20 °C. Increasing the flow rate reduces the temperature difference between flow and return and lowers the required flow temperature.
The starting point is a flow temperature of 45 °C and a return temperature of 35 °C at approximately 86 l/h. The model keeps the radiator’s logarithmic mean temperature difference relative to the room constant and calculates the flow-to-return temperature difference from the heat balance for water (1.163 Wh per litre and kelvin).
Simplified radiator example, not a sizing recommendation. Pump power consumption, flow-dependent heat transfer and buffer mixing are not calculated. The animation only shows the direction of flow and the relative flow rate.
Higher flow rate → smaller flow-to-return ΔT → lower required flow temperature.
Starting point: approximately 86 l/h, 45 °C flow temperature and 35 °C return temperature. Increasing the flow rate allows a lower flow temperature at the same heat output. The additional benefit decreases as the flow rate increases.
Balancing the flow rates
To understand the balancing of the flow rates between the primary circuit and heating circuit, it is necessary to examine the control of the circuits somewhat more closely. In the primary circuit, the target variable is the temperature difference dT between flow (TC3) and return (TC0), the so-called temperature difference. The temperature difference is achieved by controlling the flow rate of the speed-controlled primary circuit pump (PC0). If the temperature difference is too low, PC0 reduces the flow rate so that the water can absorb more heat in the heat exchanger and the temperature difference increases. If the temperature difference is too high, PC0 increases the flow rate.
In the heating circuit, on the other hand, the differential pressure is set. The temperature difference results from the transferred heat output and the flow rate. It is not specified directly as a target value here, but can be influenced via the pump setting and the throttling of the heating surfaces. The set differential pressure ensures a constant flow rate in the heating circuit. This naturally applies only if the valve position at the radiators or underfloor heating remains unchanged. If the thermostat changes the valve position, the resistance changes and PC1 must adjust the flow rate to ensure a constant differential pressure. For better efficiency and stability, the thermostats should therefore always be as open as possible, and the flow should be set permanently at the valve bottom section or flow regulator as described under Heating curve and thermal balancing.
By default, the Bosch CS 5800/6800i and Buderus WLW 176/186i have a primary circuit temperature difference of 4.5 K for underfloor heating and 7.5 K for radiators, and a differential pressure of 250 mbar.
If
- the primary circuit has a higher flow rate than the heating circuit can absorb—the primary circuit then draws warm water directly back into the return and the heat pump switches off—or
- the primary circuit produces a lower flow rate than the heating circuit draws—the heating circuit then transports colder water from its return directly back into its flow. This would cause the temperature in the heating circuit to fall. However, the heat pump control ensures that the flow temperature (T0) in the heating circuit follows the target flow temperature from the heating curve. The control achieves this by increasing the flow temperature in the primary circuit (TC3). This requires more output and consequently reduces efficiency.
Interactive circuit simulator
The following simulator allows you to visualize the three circuits (refrigerant circuit, primary circuit and heating circuit).
Caution: The simulator is only an initial, very simplified attempt to simulate the heat pump processes and certainly still contains some errors. If you have specific suggestions for improvement, feel free to create a pull request.